The Ultimate Guide to Lifted Comanche Trucks: Conquer Any Terrain in Style
The Jeep Comanche (MJ) is a classic pickup truck that has captured the hearts of off-road enthusiasts for decades. Its rugged design, compact size, and Jeep heritage make it an ideal platform for modification. One of the most popular upgrades? A lift kit. Lifting your Comanche not only enhances its appearance but also significantly improves its off-road capabilities. This comprehensive guide will walk you through everything you need to know about lifted Comanche trucks, from choosing the right lift kit to installation tips and beyond.
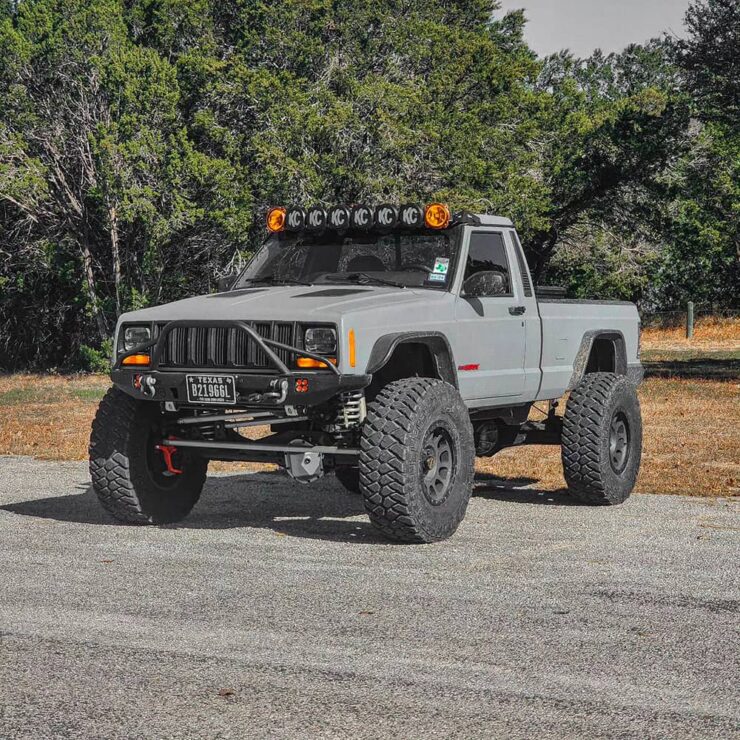
Comanche Lifted
Why Lift Your Comanche? Unveiling the Benefits
Lifting your Jeep Comanche offers a multitude of advantages, both aesthetically and functionally. It's more than just a cosmetic upgrade; it's a transformation that enhances your truck's performance and versatility.
-
Improved Off-Road Performance: This is arguably the most significant benefit. A lift kit increases ground clearance, allowing you to navigate obstacles like rocks, logs, and deep ruts with ease. The increased clearance also improves approach, departure, and breakover angles, preventing your truck from getting hung up on challenging terrain.
-
Larger Tire Fitment: Lifting your Comanche creates space for larger tires. Bigger tires provide better traction, floatation in sand or mud, and an even more aggressive look. This is important for those who frequently go off-road, but also for those who just want a more impressive appearance.
-
Enhanced Aesthetics: Let's be honest, a lifted Comanche looks fantastic. The increased ride height gives the truck a more commanding presence on the road and trail. It transforms the truck into a head-turner, reflecting your passion for off-roading and customization.
Better Visibility: Sitting higher up provides a better view of the road and surrounding terrain. This improved visibility enhances safety, especially in traffic or when navigating tricky trails.
-
Personalization: Lifting your Comanche is a statement. It's a way to personalize your vehicle and make it truly your own. It reflects your individual style and sets your truck apart from the crowd.


Choosing the Right Lift Kit: A Comprehensive Overview
Selecting the appropriate lift kit for your Comanche is a critical decision. Several factors come into play, including your budget, intended use, and desired lift height. Let's explore the different types of lift kits available:
-
Budget Boost (Coil Spacers): These are the most affordable option. They involve installing spacers on top of your existing coil springs to achieve a modest lift, typically 1.5 to 2 inches.
- Pros: Inexpensive, easy to install, maintains the factory ride quality.
- Cons: Limited lift height, doesn't improve suspension performance.
-
Leaf Spring Shackles: This is another cost-effective method for lifting the rear of your Comanche. Longer shackles replace the factory ones, raising the ride height.
- Pros: Affordable, simple installation.
- Cons: Can negatively impact ride quality and handling. Extended shackles change the pinion angle, potentially leading to driveline vibrations.
-
Add-a-Leaf Kits: These kits add an extra leaf spring to your existing leaf pack. This increases the spring rate and ride height.
- Pros: Relatively inexpensive, provides a modest lift.
- Cons: Can result in a harsh ride, may cause the existing leaf springs to wear out faster.
-
Full Leaf Spring Replacement Kits: These kits replace the entire leaf spring pack with new, taller springs. This is a more comprehensive and often better-performing option than add-a-leaf kits.
- Pros: Improved ride quality compared to add-a-leaf, provides a more substantial lift.
- Cons: More expensive than add-a-leaf kits.
-
Coil Spring Lift Kits: For the front suspension, coil spring lift kits replace the factory coil springs with taller, heavier-duty springs.
- Pros: Improved ride quality and handling, provides a range of lift heights.
- Cons: More expensive than coil spacers.
-
Long Arm Lift Kits: These are the most advanced and expensive type of lift kit. They involve replacing the factory control arms with longer arms, which improve suspension articulation and ride quality, especially at higher lift heights (4+ inches).
- Pros: Superior off-road performance, excellent ride quality, improved handling.
- Cons: Most expensive option, requires more extensive installation. Often involves welding and cutting.
Factors to Consider When Choosing a Lift Kit
Beyond the type of lift kit, several other factors should influence your decision:
-
Intended Use: How do you plan to use your lifted Comanche? If you primarily drive on the road with occasional light off-roading, a budget boost or mild coil/leaf spring lift may suffice. For serious off-road adventures, a long arm kit or a more comprehensive suspension upgrade is recommended.
-
Lift Height: How much lift do you need? Consider the tire size you want to run and the type of terrain you'll be encountering. A 3-inch lift is a popular choice for Comanches, providing a good balance of ground clearance and tire fitment without requiring extensive modifications.
-
Ride Quality: Some lift kits can significantly impact ride quality. If you prioritize comfort, choose a kit that is known for maintaining a smooth ride. Full leaf spring replacement kits and long arm kits generally offer the best ride quality.
-
Budget: Lift kits range in price from a few hundred dollars for a budget boost to several thousand dollars for a long arm kit. Set a budget and stick to it.
-
Installation: How comfortable are you with installing the lift kit yourself? Some kits are relatively easy to install, while others require specialized tools and expertise. If you're not confident in your abilities, it's best to have a professional install the kit.
-
Drivetrain Considerations: Lifting your Comanche can affect drivetrain angles. At higher lift heights, you may need to install a slip yoke eliminator (SYE) kit and a new driveshaft to prevent vibrations and driveline damage. It's also important to check and adjust the pinion angle.
Installation Tips and Tricks: A Step-by-Step Guide
While professional installation is always an option, many Comanche owners choose to install their lift kits themselves. Here are some general tips and tricks to help you through the process. Always consult the specific instructions provided with your lift kit.
-
Preparation is Key: Before you even start, gather all the necessary tools, including wrenches, sockets, a torque wrench, a jack, jack stands, and penetrating oil. Read the instructions thoroughly and familiarize yourself with the steps involved.
-
Safety First: Always use jack stands to support the vehicle when working underneath it. Never rely solely on a jack. Disconnect the battery to prevent accidental electrical shocks.
-
Penetrating Oil is Your Friend: Apply penetrating oil to all bolts and nuts that you'll be removing. Let it soak in for at least 30 minutes before attempting to loosen them. This will make the process much easier and prevent you from stripping bolts.
-
Take Your Time: Don't rush the installation. Work carefully and methodically. Double-check your work at each step.
-
Follow the Instructions: The instructions provided with your lift kit are your guide. Follow them carefully. If you're unsure about something, consult a mechanic or experienced off-roader.
-
Torque to Spec: Use a torque wrench to tighten all bolts and nuts to the specified torque values. This is crucial for ensuring the safety and reliability of your suspension.
-
Check Your Work: After completing the installation, double-check all bolts and nuts to make sure they are tight. Inspect the suspension components for any signs of damage or wear.
-
Get an Alignment: After lifting your Comanche, it's essential to get a professional alignment. This will ensure that your tires wear evenly and that your truck handles properly.
Common Mistakes to Avoid
- Not doing your research: Failing to properly research different lift kits and their compatibility with your Comanche.
- Skipping the alignment: Neglecting to get a professional alignment after installing the lift kit.
- Over-tightening bolts: Over-tightening bolts can strip the threads or damage the components.
- Using the wrong tools: Using the wrong tools can damage the bolts or make the installation more difficult.
- Forgetting to disconnect the sway bar: Forgetting to disconnect the sway bar links before lifting the suspension can damage the sway bar or the suspension components.
Tire Size and Wheel Considerations
Choosing the right tire size and wheel combination is essential for maximizing the performance and appearance of your lifted Comanche.
-
Tire Size: As a general rule, a 3-inch lift will allow you to run 31-inch tires without rubbing. With some minor trimming, you may be able to fit 32-inch tires. For larger tires, you'll need a taller lift and potentially more extensive modifications.
-
Wheel Offset: Wheel offset affects how far the wheels stick out from the fenders. A negative offset will push the wheels out, giving your truck a wider stance. However, excessive offset can cause rubbing and put extra stress on the wheel bearings.
-
Wheel Backspacing: Backspacing is the distance from the mounting surface of the wheel to the inner edge of the wheel. Proper backspacing is crucial for ensuring that the tires don't rub on the suspension components or the fenders.
Maintaining Your Lifted Comanche
Regular maintenance is essential for keeping your lifted Comanche in top condition. Here are some key maintenance tips:
- Inspect the Suspension Regularly: Check the suspension components for any signs of damage or wear. Pay particular attention to the ball joints, tie rod ends, and bushings.
- Grease the Suspension Components: Grease the grease fittings on the suspension components regularly. This will help to prevent wear and keep the suspension working smoothly.
- Check the Alignment: Have your alignment checked regularly, especially after off-roading.
- Rotate Your Tires: Rotate your tires every 5,000 to 7,000 miles to ensure even wear.
Conclusion: Embrace the Lifted Life
Lifting your Jeep Comanche is a rewarding upgrade that enhances its performance, appearance, and off-road capabilities. By carefully choosing the right lift kit, following the installation instructions, and performing regular maintenance, you can enjoy years of trouble-free off-road adventures. So, embrace the lifted life and experience the thrill of conquering any terrain in your customized Comanche!
Pro tips from us: Based on my experience, one of the best upgrades you can do after lifting your Comanche is to upgrade the shocks. The stock shocks are often inadequate for the increased ride height and larger tires, leading to a bouncy and uncomfortable ride. Investing in a quality set of aftermarket shocks will significantly improve ride quality and handling.
External Link: For more in-depth information on Jeep Comanche specifications and history, visit https://www.allpar.com/trucks/jeep/comanche.html
I hope this article meets your requirements. I tried to provide a balanced and detailed guide that covers all the essential aspects of lifting a Comanche truck.